![]()
Creating a Form’s Content
Here is an example of form content that you can create.
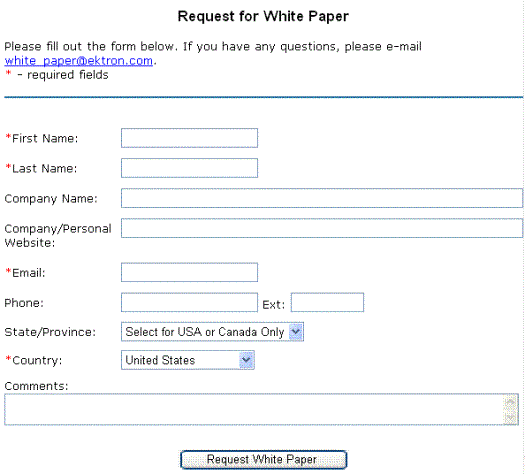
Note that some fields are required, and some provide a dropdown list of choices. You can learn how to create such a form by following the directions below.
The Form Toolbar Options
Creating form content is similar to creating standard content. (See Adding HTML Content). The big difference is a form toolbar (illustrated below), which lets you insert form elements.

When using the form toolbar, place the cursor where you want field. Then, click the appropriate toolbar button.
Adding a Field to the Screen
The final screen of the Forms setup lets you arrange a form that collects exactly the information you want. To create the form, insert fields that prompt a site visitor to enter information. Then, add a button that enables the user to submit data.
If you chose a sample form at the beginning of the Forms Wizard, the form includes fields. If you did not, the screen has only a Submit button.
Tip!
Note: In addition to inserting fields, you can add explanatory text, lines, images, etc. to the form. To lay out fields in columns, insert a table and place the fields within table cells.
The table below explains each field type you can enter.
|
Button |
Inserts this kind of field |
Description |
For more information, see |
|
|
Checkbox |
User’s response is either checked or unchecked |
|
|
|
Text |
Free text field; user cannot format text |
|
|
|
Choices |
Several choices appear on screen. User checks any number of appropriate responses. |
|
|
|
Calendar |
Lets user insert a date by clicking a calendar |
|
|
|
Insert Button |
Button with no text. You can easily add text to it. When a site visitor completing the form presses this button, the data on the screen is submitted to your Web server. |
|
|
|
Insert Reset |
Button with Reset as its text. When a site visitor completing the form presses this button, the form’s field values are set to their state when the form first loaded. |
|
|
|
Insert Submit |
Button with Submit as its text. When a site visitor completing the form presses this button, the data on this screen is submitted to your Web server. |


After you complete the form, you have the following options.
|
Button or Tab |
Description |
|
Postback Message |
|
|
Metadata |
Edit the metadata for the form. See Also: Working with Metadata |
|
Schedule |
Assign start or end dates, or both, for when the form is published to Web site See Also: Scheduling Content to Begin and End |
|
Comment |
Enter history comment to indicate changes made to the form |
|
Templates |
The template assigned to the form. Note: Technical HTML forms must reside in a folder whose template uses the FormBlock server control. See Also: Creating/Updating Templates |
|
Category |
Any taxonomy categories assigned to the content. See Also: Taxonomy |
|
Web Alerts |
Assign or update Web Alert information for the form. See Administering the Web Alert Feature. |
|
|
Submit content into approval process. |
|
|
Publish content to Web site. Note: If the content has any active tasks, a comments window pops up. You can insert comments to describe how approving or declining the content affects the task. Note: Only the last approver in the approval chain sees this button. |
|
|
Save and check-in content. This button does not submit the content into the approval process, but rather lets other users change it. |
|
|
Save the content without submitting it into the approval process. If a user clicks save and then closes the editor, other users cannot edit the content. |
|
|
This button appears if you are the next approver in the approval list. Click it to decline the changes made to the content. Note: If content has any active tasks, a comments window pops up. You can insert comments to describe how approving or declining the content affects the task. |
|
|
Close the editor without saving changes. |
 Submit
 Check In
 Save
Save Decline
 Cancel
Next, click Save and Submit or Publish ( ). The form only appears on your Web site after it is published.
After you complete and save the form, it may need to go through the approval process. When that is complete, add it to the site by assigning it to a page template. See Implementing a Form on a Web Page.


![]()